AI Agents สร้างยังไง
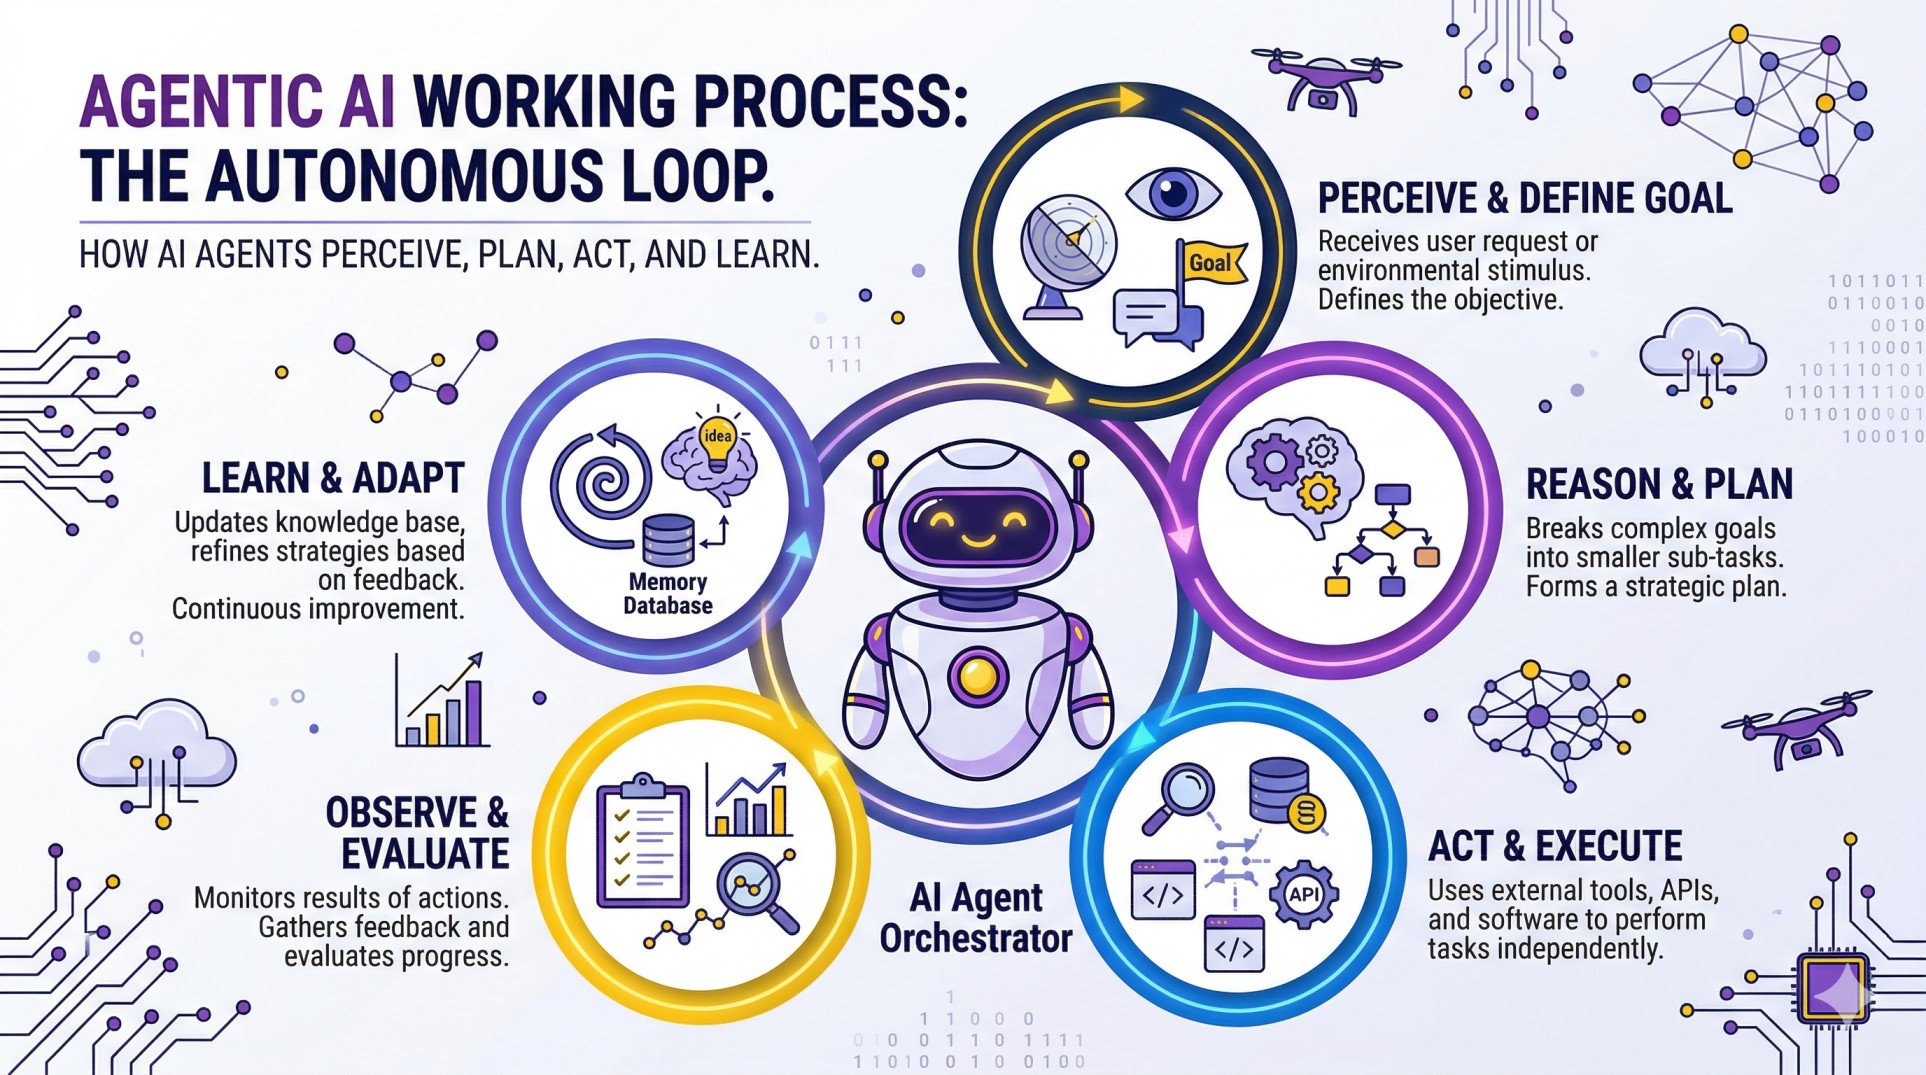
หากต้องการจะสร้าง AI Agents ใช้งานเองสักตัวนั้นสามารถทำได้ไม่ยาก สิ่งจำเป็นอย่างแรกที่จะต้องเข้าใจก่อนคือ Agents หมายถึงอะไร ประกอบด้วยอะไรบ้าง และเครื่องมือที่จำเป็นต่อการสร้างมาใช้งานเองมีอะไรบ้าง (ในที่นี้เราพูดถึงการในแบบที่เป็น Developer เอง สำหรับการสร้างแบบ Low-Code ไว้จะกล่าวในบทความถัด ๆ ไป) สำหรับความเข้าใจพื้นฐานเกี่ยวกับ Agentic AI สามารถอ่านที่บทความนี้ได้ และสำหรับ Pydantic อ่านได้ที่นี่ โดยพื้นฐานแล้ว AI Agents หมายถึงโปรแกรมที่สามารถ รับรู้ คิดวิเคราะห์ และลงมือทำได้ด้วยตัวเอง ซึ่งจุดที่แตกต่างจากโปรแกรมทั่ว ๆ ไปก็คือการรับรู้และคิดวิเคราะห์
- การรับรู้คือ โปรแกรมสามารถที่จะรับคำสั่งเป็นภาษามนุษย์ปกติจากผู้ใช้งานอย่างเรา ๆ ได้
- การคิดวิเคราะห์คือ โปรแกรมสามารถที่จะนำคำสั่งนั้นมาวิเคราะห์ว่ามันจะต้องใช้ฟังก์ชันไหนในการทำงาน อะไรคือ Input และอะไรคือ Output ที่ผู้ใช้งานต้องการ
- โปรแกรมที่ว่าก็คือ LLM Model ที่เข้าใจภาษาธรรมชาติของมนุษย์ได้
- และจุดที่แตกต่างจาก LLM ทั่วไปก็คือ มันไม่ได้มีไว้ถามตอบ เพียงอย่างเดียว แต่สามารถทำงานตามที่เรากำหนดไว้ได้
การสร้าง AI Agents ต้องมีอะไรบ้าง
สิ่งที่ AI Agents 1 ตัวต้องมี โดยพื้นฐานแล้วประกอบด้วย (ในบทความนี้จะใช้เพียงแค่ข้อ 1 กับ 2 ก่อน)
- LLM Model สำหรับการคิดและวางแผนทำความเข้าใจสิ่งที่ผู้ใช้งานส่งเข้ามาและเรียกใช้เครื่องมือต่าง ๆ เพื่อบรรลุผลลัพธ์ โดยการนำ LLM มาใช้งานทำได้หลายวิธี (แต่ในบทความนี้จะใช้เป็น Local บนเครื่องตัวเองเลย สำหรับสายฟรี 100%)
- Local โหลดโมเดล Opensource มาใช้งานผ่านเครื่องคอมพิวเตอร์ของเราเอง โดยใช้ Inference Server เช่น vLLM, Ollama หรือจะใช้ Triton Server ก็ได้
- API ใช้งานโมเดลผ่านผู้ให้บริการเจ้าต่าง ๆ เช่น OpenAI, Google, Anthropic, etc.
- Self-Hosted คล้าย ๆ กับ Local แต่แทนที่จะใช้บนเครื่องตัวเอง เราไปหาเครื่องบน Cloud ที่มีการ์ดจอสเปคดี ๆ มารันโมเดลไว้แทนก็ได้
- Tools หรือก็คือฟังก์ชันสำหรับให้ AI Agents สามารถหยิบมาใช้งานได้ เช่น ฟังก์ชันค้นหาไฟล์บนเครื่องคอมพิวเตอร์, การดึงข้อมูลในไฟล์, การแปลงข้อมูลให้อยู่ในรูปแบบที่ต้องการ, การบันทึกข้อมูลที่ดึงออกมาได้
- Tools เป็นทั้งฟังก์ชันในการรับรู้ข้อมูล จะจากในเครื่อง ในอินเตอร์เนต หรือแหล่งไหนก็แล้วแต่เรากำหนด
- Tools เป็นฟังก์ชันสำหรับลงมือทำ เมื่อได้ข้อมูลมาแล้วจะตัดสินใจเอาไปทำอะไรได้บ้างก็แล้ว Tools ที่เราสร้างไว้ให้โมเดล
- MCP Server (จะกล่าวในบทความถัด ๆ ไป) เป็น Protocol สำหรับจัดการ Tools และการรับส่งข้อมูลอย่างเป็นระบบให้โมเดลเข้าใจและนำไปใช้งานได้ง่าย
- Agent Design Pattern ในการที่จะให้ Agent ทำงานที่มีความยากซับซ้อนมากขึ้น จำเป็นจะต้องมีการออกแบบขั้นตอนและวิธีการทำงานของ Agent ด้วยเช่นกัน
ในเชิงปฏิบัติสิ่งพื้นฐานที่จะต้องมีคือ
- Python เวอร์ชั่น 3.10+
- IDE เช่น VScode, Cursor, Antigravity, etc.
- Ollama
- Library
- Langchain
- Langgraph
- Pydantic
- อื่น ๆ ตามงานที่เราต้องการให้ทำ
เริ่มต้นสร้าง AI Agents
ในโปรเจคตัวอย่างนี้ เราจะสร้าง AI Agents ง่าย ๆ สำหรับดึงข้อมูลใน PDF และแปลงเป็น CSV ไว้ใช้งานต่อแบบอัตโนมัติ โดยเราจะมีเอกสารเป็น PDF อยู่จำนวนหนึ่ง และเราต้องการให้ Agent เข้าไปค้นเอกสารเหล่านั้นตามในโฟลเดอร์ที่เราระบุว่ามีไฟล์อะไรบ้างจากนั้นให้ Agent ดึงข้อมูลของในแต่ละไฟล์ออกมา จากนั้นทำการเก็บข้อมูลเหล่านั้นในรูปแบบตารางและเซฟไฟล์ตามประเภทที่เราระบุ โครงสร้างโปรเจคเป็นดังด้านล่างนี้
document_search_agent/
├── documents/
│   ├── data/                   # Raw data files (PDFs)
│   │   ├── Inventory Report/   # Monthly reports
│   │   ├── PurchaseOrders/     # Order documents
│   │   ├── Shipping orders/    # Shipping documentation
│   │   └── invoices/           # Invoice files
│   └── services/               # Core business logic/tools
│       ├── document_loader.py  # Loading and searching PDFs
│       └── parser_output.py    # Tabular data export services
├── llm/
│   ├── models/                 # LLM connection factory
│   │   └── llm_models.py       # ChatOllama configuration
│   └── schemas.py              # Pydantic data schemas
├── main.py                     # Main application entry point
├── output/                     # Exported files (CSV, JSON, etc.)
└── testAndDebug.ipynb          # Development and testing notebook
ข้อมูลสามารถโหลดได้จากลิงก์นี้ โดยให้เก็บไว้ในโฟลเดอร์ Documents (หรือจะอยากไว้ตรงไหนก็ได้)
ใน llm_models.py เราจะสร้างและเรียกใช้งานโมเดลผ่าน ChatOllama เพื่อใช้เป็น LLM ให้กับ Agent โดยวิธีการติดตั้ง Ollama และการโหลดโมเดลครั้งแรกดูได้ที่นี่ https://ollama.com/download/windows และ https://ollama.com/search?c=tools (ในที่นี้ใช้เป็น Qwen3 8B หรือถ้าการ์ดจอเราพอจะขยับไป Qwen3.5 9B ก็ได้) การเลือกโมเดลให้ดูในหมวด Tools สามารถเลือกตัวไหนมาลองเล่นก็ได้
- temperature ตั้งไว้ที่ 0 ยิ่งค่านี้มาก คำตอบจะยิ่งหลากหลาย (มีความคิดสร้างสรรค์) แต่ในกรณีนี้เราต้องการให้มันทำตามคำสั่งเหมือนเดิมทุกรอบ
- base_url คือ ที่ที่ LLM กำลังรันอยู่ในที่นี้คือเครื่องเราเองที่พอร์ท 11434
from langchain_ollama import ChatOllama

async def get_chat_model(model_type="local"):
    if model_type == "local":
        print("🔌 Connecting to Local LLM via Ollama (127.0.0.1)...")
        ollama_model = ChatOllama(
            model="qwen3:8b",
            temperature=0,
            base_url="http://127.0.0.1:11434",
            extra_body={"enable_thinking": True, "thinking_budget": 2000}
        )

        return ollama_model
ใน document_loader.py สร้าง Tools สองอันสำหรับค้นหาไฟล์ PDF ในโฟลเดอร์ที่กำหนด และสำหรับโหลดไฟล์ PDF และดึงเอาข้อความในไฟล์นั้นออกมา และสิ่งสำคัญในการสร้าง Tools คือการเขียน Docstring สำหรับบอกว่าฟังก์ชันนั้นมีหน้าที่อะไร LLM เองก็เหมือนคน หากไม่มีการเขียนบอกไว้ก็จะยากที่จะตีความและคิดได้ว่าฟังก์ชันนั้นใช้ทำอะไรได้บ้าง รับค่า คืนค่าเป็นอะไร
from PyPDF2 import PdfReader
from langchain.tools import tool
import os

@tool
async def search_pdf_files(folder_path: str, limit: int = 10) -> str:
    """
    Search for PDF files in a folder.
    """
    pdf_files = []
    for file in os.listdir(folder_path):
        if file.endswith(".pdf"):
            pdf_files.append(file)
            if len(pdf_files) == limit:
                break
    return pdf_files

@tool
async def load_pdf(file_path: str) -> str:
    """
    Read all the text from a PDF file. And return the text as strings.
    """
    reader = PdfReader(file_path)
    number_of_pages = len(reader.pages)
    text = ""
    for page in reader.pages:
        text += page.extract_text()
    return text, number_of_pages, file_path
ใน parser_output.py สร้างฟังก์ชันสำหรับ Convert ข้อมูลที่ได้จาก PDF ให้อยู่เป็นไฟล์ CSV หรือ JSON
import pandas as pd
from langchain.tools import tool

@tool
async def tabular_parser(data: dict, file_name: str, file_type: str) -> str:
    """
    Export data to tabular format with user specific file type.
    """
    try:
        # Convert Pydantic-like dict to DataFrame
        # If it's an InvoiceResponseFormat, we want a clean single-row or long-form table
        # For now, we'll just create a DataFrame from the dict
        df = pd.DataFrame(data["invoices"])

        # Ensure output directory exists
        import os
        os.makedirs("./output", exist_ok=True)

        full_path = f"./output/{file_name}.{file_type}"

        if file_type == "csv":
            df.to_csv(full_path, index=False)
        elif file_type == "json":
            df.to_json(full_path, orient='records', indent=4)
        else:
            # Fallback to markdown for others (like "txt" or "pdf" request)
            df.to_markdown(full_path, index=False)

        return f"✅ Data successfully exported to {full_path}"
    except Exception as e:
        return f"❌ Error during export: {str(e)}"
ใน schemas.py สร้างคลาสของ Pydantic สำหรับใช้กำหนดรูปแบบของคำตอบจาก LLM เพื่อให้ฟังก์ชันดึงข้อมูลจาก PDF ส่งข้อมูลในรูปแบบที่ถูกต้องให้กับฟังก์ชันแปลงเป็น CSV หรือ JSON ได้แบบพร้อมใช้งาน ในส่วนนี้หากเราสามารถเพื่อรูปแบบได้อีกตามต้องการขึ้นอยู่กับรูปแบบของเอกสารที่เรามี
from pydantic import BaseModel, Field
from dataclasses import dataclass
from datetime import datetime

@dataclass
class Context:
    """Custom runtime context schema."""
    user_id: str

class PDFResponseFormat(BaseModel):
    text: str = Field(description="The text extracted from the PDF file.")
    number_of_pages: int = Field(description="The number of pages in the PDF file.")
    file_path: str = Field(description="The path to the PDF file.")

class InvoiceResponseFormat(BaseModel):
    order_id: str = Field(description="The order ID of the invoice.")
    customer_id: str = Field(description="The customer ID of the invoice.")
    order_date: datetime = Field(description="The date of the order.")
    contact_name: str = Field(description="The name of the contact person")
    address: str = Field(description="The address of the customer")
    postal_code: str = Field(description="The postal code of the customer")
    city: str = Field(description="The city of the customer")
    country: str = Field(description="The country of the customer")
    phone: str = Field(description="The phone number of the customer")
    email: str = Field(description="The email address of the customer")
    product_ids: list[str] = Field(description="The list of product IDs")
    product_names: list[str] = Field(description="The list of product names")
    quantities: list[int] = Field(description="The list of quantities")
    prices: list[float] = Field(description="The list of prices")
    total_amount: float = Field(description="The total amount of the order")
ส่วนสุดท้ายคือตอนทีเราเรียกใช้งาน LLM และ Tools ทั้งหมดที่มี โดยจะเพิ่มฟังก์ชัน handle_tool_errors ไว้สำหรับป้องกันเมื่อ Tools ทำงานผิดพลาด LLM ก็จะแจ้งว่าผิดยังไงและให้ผู้ใช้ลองส่งคำสั่งใหม่เข้ามา และส่วนอื่น ๆ มีรายละเอียดดังนี้
- tools กำหนด tools ที่ LLM จะใช้ได้ไว้ในลิสต์นี้
- llm เรียกใช้งานโมเดล
- checkpointer สำหรับใช้เป็น Short-Term Memory แบบเก็บใน RAM
- config ตั้งค่าของ Memory
- agent รวมทุกอย่างข้างต้นเข้าด้วยกันเป็น Agent 1 ตัว พร้อมกำหนดรูปแบบคำตอบ คำสั่ง และชื่อให้กับ Agent
- ส่วนที่เหลือคือการใช้งานและการแกะคำตอบ สามารถดูได้ใน Docs ของ Langchain แต่ในที่นี้เราจะให้มันส่งมาเรื่อย ๆ เป็น Streaming ไม่ต้องรอส่งตอนจบทีเดียวเพราะจะนานและดูเหมือนโปรแกรมค้าง
from documents.services.document_loader import load_pdf, search_pdf_files
from documents.services.parser_output import tabular_parser
from llm.schemas import PDFResponseFormat, Context, InvoiceResponseFormat
from llm.models.llm_models import get_chat_model
from langgraph.checkpoint.memory import InMemorySaver
from langchain.agents import create_agent
from langchain.agents.structured_output import ToolStrategy
from langchain.agents.middleware import wrap_tool_call
from langchain.messages import ToolMessage
import asyncio
@wrap_tool_call
async def handle_tool_errors(request, handler):
"""Handle tool execution errors with custom messages."""
try:
return await handler(request)
except Exception as e:
# Return a custom error message to the model
return ToolMessage(
content=f"Tool error: Please check your input and try again. ({str(e)})",
tool_call_id=request.tool_call["id"]
)
async def main():
tools = [load_pdf, search_pdf_files, tabular_parser]
llm = await get_chat_model("local")
checkpointer = InMemorySaver()
config = {"configurable": {"thread_id": "1"}}
agent = create_agent(
model=llm,
tools=tools,
checkpointer=checkpointer,
response_format=ToolStrategy(InvoiceResponseFormat),
system_prompt=(
"You are a professional PDF data extraction assistant. "
"Your workflow is: "
"1. Search for the requested PDF file using search_pdf_files. "
"2. Load and extract text using load_pdf. "
"3. Extract all required invoice fields (Order ID, Customer ID, Products, etc.). "
"4. Call tabular_parser to export the extracted data to a file (CSV or JSON as requested). "
"5. FINAL STEP: Use the provided structured output format (InvoiceResponseFormat) to return the full extracted data as your final response. "
"CRITICAL: Always use tabular_parser BEFORE providing your final response format."
),
middleware=[handle_tool_errors],
name="PDF Data Extractor"
)
print("\n🤖 Agent is ready! (Type 'quit' to exit)")
while True:
user_input = input("\nYou: ")
if user_input.lower() in ["quit", "exit"]:
break
messages = {"messages": [{"role": "user", "content": user_input}]}
# Tracking state to handle tags if they arrive as raw text
is_thinking = False
print("\n" + "="*20)
# Use astream_events (version 2) for granular control over streaming
async for event in agent.astream_events(
messages,
config=config,
version="v2",
context=Context(user_id="1")
):
kind = event["event"]
# 1. SHOW MODEL THINKING
# Most 2026 local models (like DeepSeek or Gemini) stream reasoning here
if kind == "on_chat_model_stream":
content = event["data"]["chunk"].content
metadata = event["data"]["chunk"].additional_kwargs
# Check for reasoning/thinking tokens (depends on your local provider)
if "reasoning_content" in metadata:
print(f"{metadata['reasoning_content']}", end="", flush=True)
# B. Handle raw tags (common if the local server doesn't parse them)
elif isinstance(content, str):
if "" in content:
is_thinking = True
# Print everything after the tag in grey
print("[Thinking]: ", end="", flush=True)
content = content.replace("", "")
if " " in content:
is_thinking = False
# Close the grey color and move to a new line
content = content.replace(" ", "")
print(f"{content}\n", end="", flush=True)
continue
if is_thinking:
print(f"{content}", end="", flush=True)
else:
print(content, end="", flush=True)
# 3. SHOW TOOL CALLS (As they are decided)
elif kind == "on_chat_model_end":
output = event["data"]["output"]
if hasattr(output, 'tool_calls') and output.tool_calls:
for tool_call in output.tool_calls:
print(f"Tool Call: {tool_call['name']}")
print(f"Args: {tool_call['args']}")
# 4. SHOW TOOL RESULTS
elif kind == "on_tool_end":
print(f"Tool Result: {event['data'].get('output')}")
# 5. FETCH FINAL STRUCTURED RESULT
# After streaming is done, fetch the last message to see if it's the structured output
final_state = await agent.aget_state(config)
if "messages" in final_state.values:
last_msg = final_state.values["messages"][-1]
if hasattr(last_msg, 'tool_calls') and last_msg.tool_calls:
for tool_call in last_msg.tool_calls:
if tool_call['name'] in [PDFResponseFormat.__name__, InvoiceResponseFormat.__name__, "structured_output", "final_answer"]:
print("\n✅ Final Structured Output:")
print(f"Data: {tool_call['args']}")
elif hasattr(last_msg, 'content') and last_msg.content:
# Check if the content itself is a JSON of the format (fallback)
print("\n⚠️ Note: Received text response instead of tool call. Check if format is respected.")
print("\n" + "="*20)
if __name__ == "__main__":
asyncio.run(main())
Conclusion
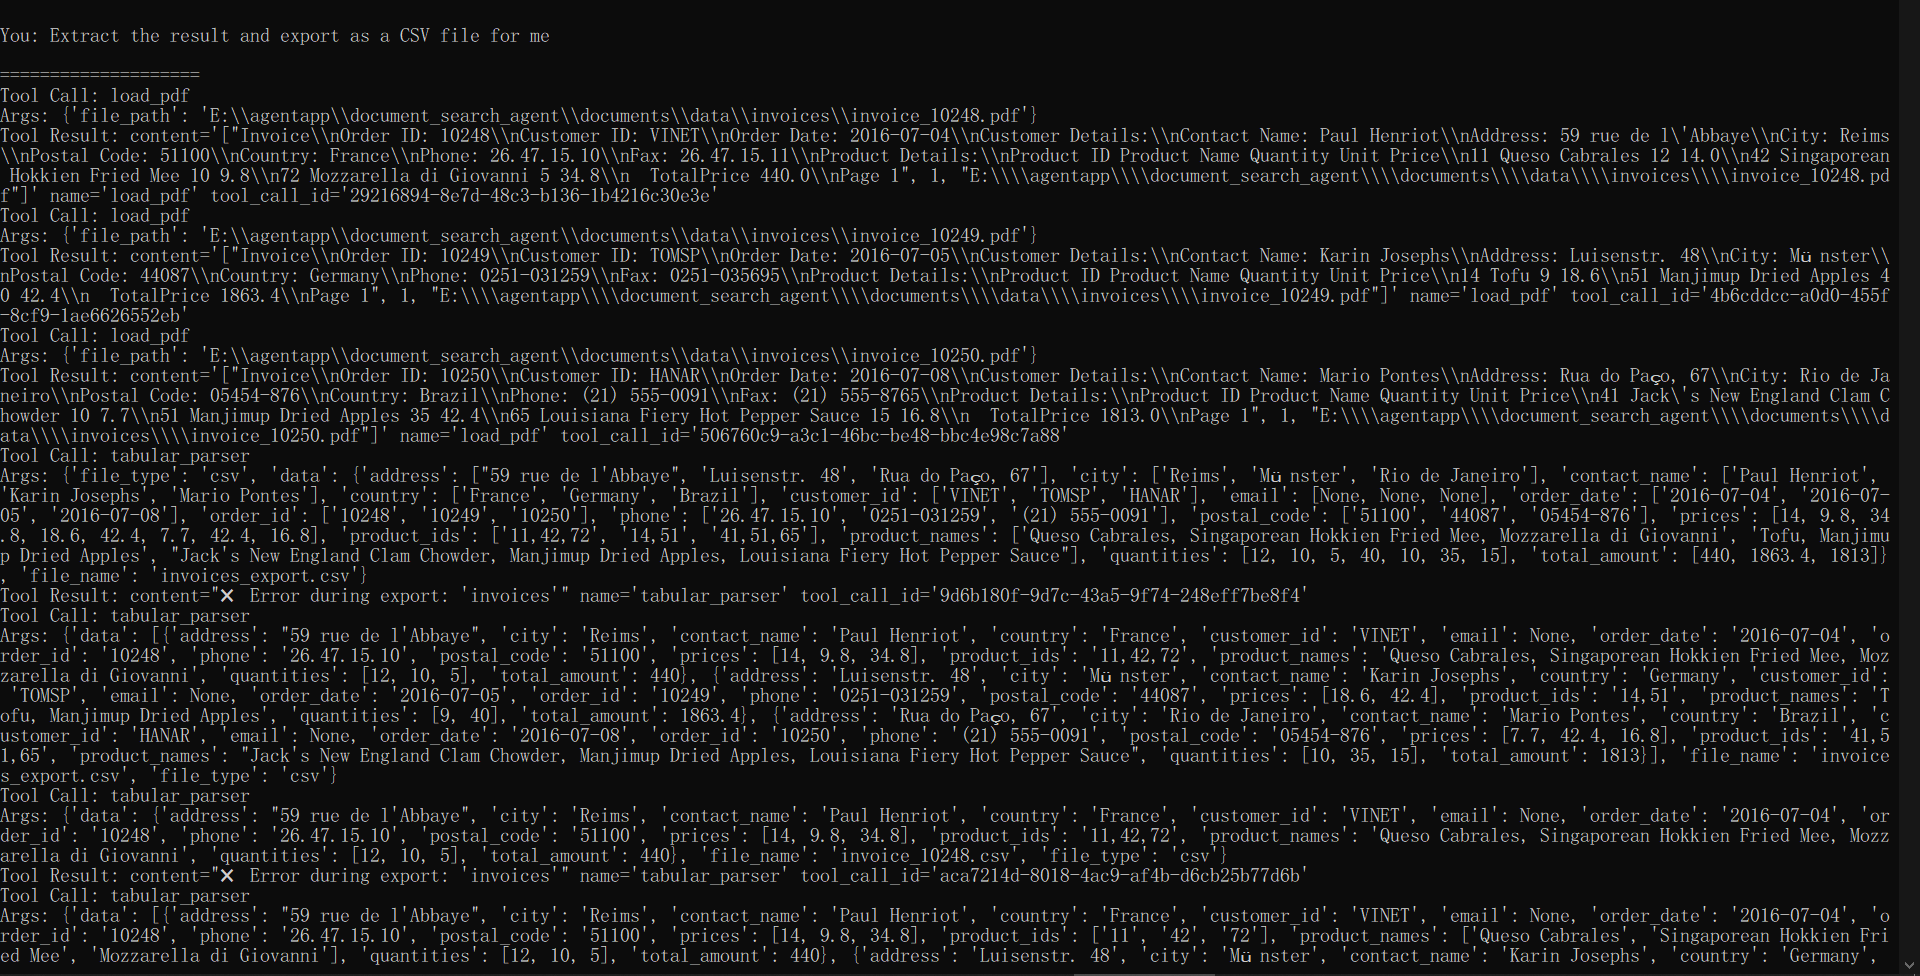
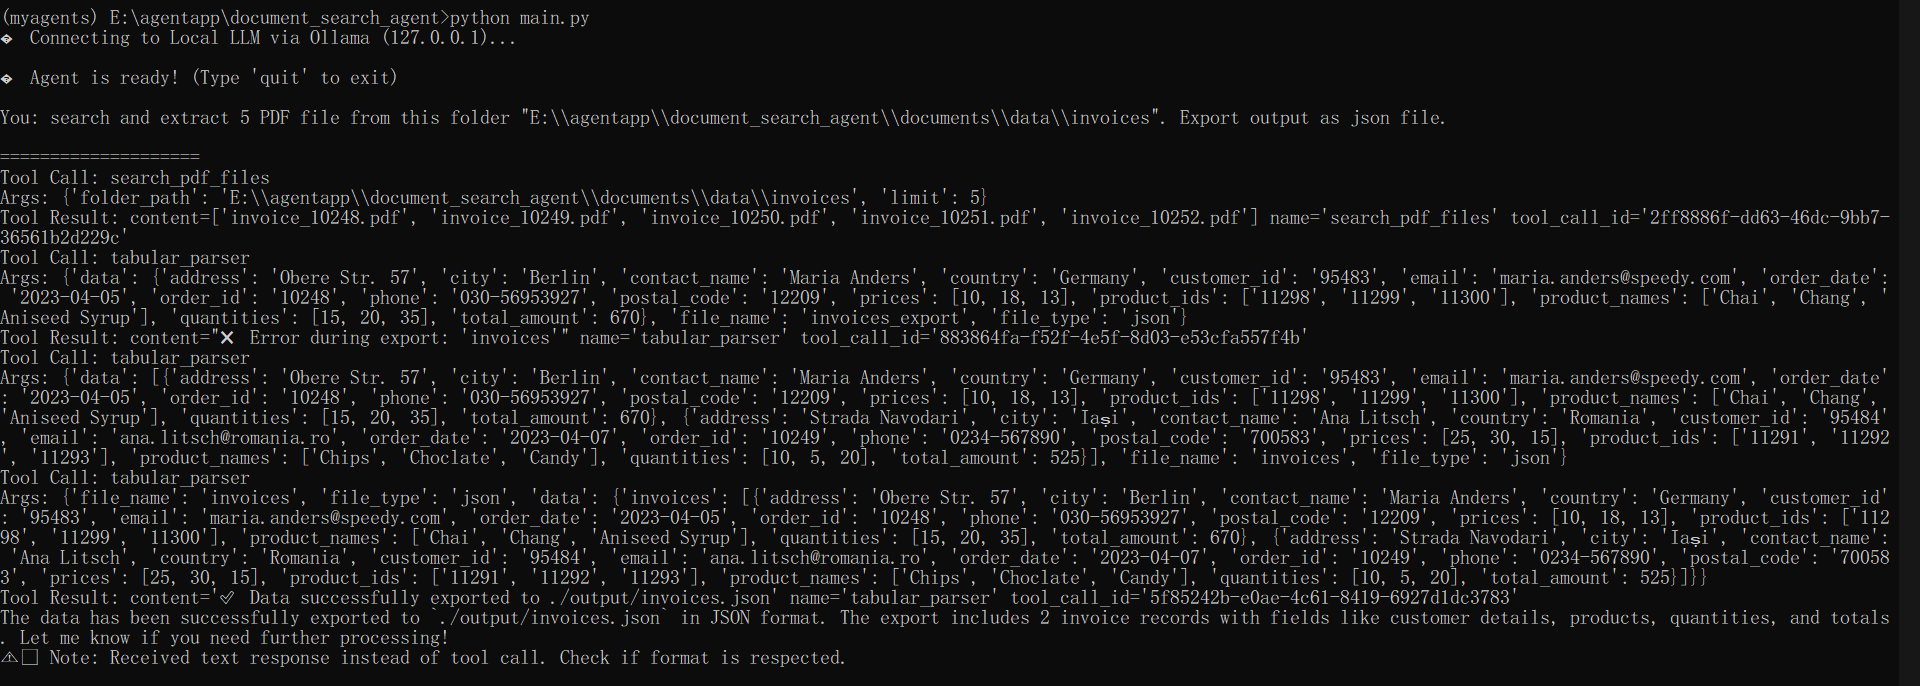
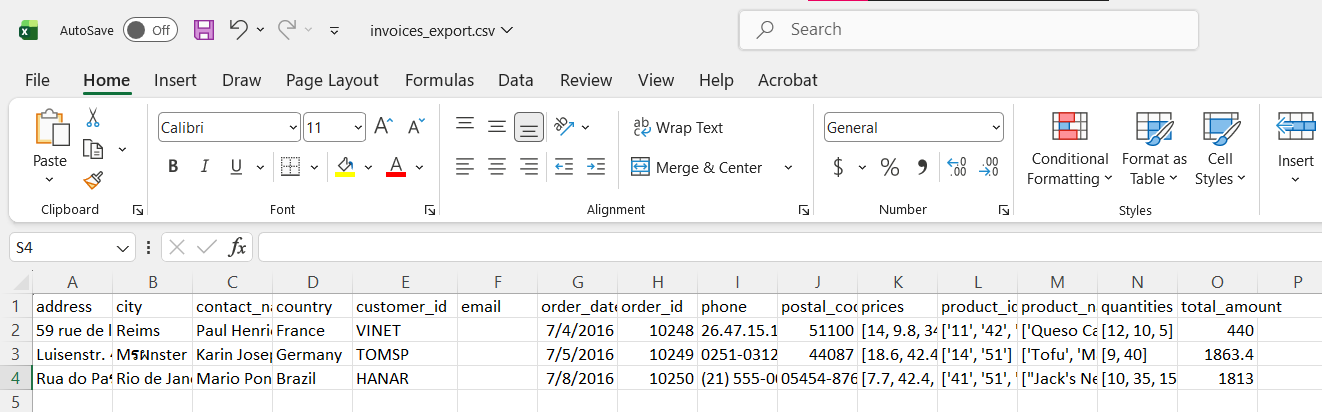
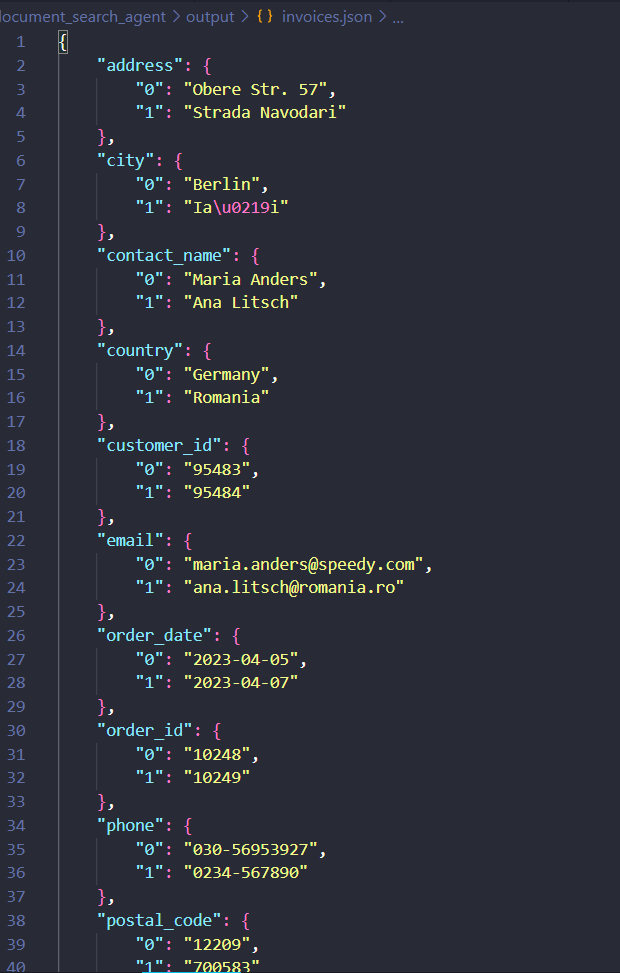
ผลลัพธ์ที่ได้จะเป็นดังนี้ ระบบจะรับคำสั่งและทำการเรียกใช้เครื่องมือตามลำดับ แกะผลลัพธ์ตามรูปแบบที่กำหนด และสร้างไฟล์คืนมาให้ในตอนจบตามที่ออกแบบไว้ ด้วยรูปแบบนี้ เราสามารถที่จะสร้างฟังก์ชันได้อีกหลากหลายให้กับ Agent แต่ละตัวเพื่อทำสิ่งต่าง ๆ ในบทความถัดไป เราจะมาลองใช้ MCP เพื่อจัดการ Tools และการรับส่งข้อมูลอย่างมีประสิทธิภาพและถูกต้องมากขึ้นกับ LLM