ค้นหาภาพในคลิปด้วย
CLIP Model (AI)

หมายเหตุ: บทความนี้แนะนำวิธีการสำหรับเขียนโปรแกรมสำหรับใช้ค้นหารูปภาพหรือฉากที่ต้องการในคลิปวิดีโอ มีจุดประสงค์หลักเพื่อการเรียนรู้และนำไปต่อยอดให้เกิดประโยชน์ เหมาะสำหรับผู้มีพื้นฐานด้านการเขียนโปรแกรม หรือที่มีความสนใจและอยากจะทดลองใช้งาน

การค้นหารูปภาพนั้นมองเผิน ๆ อาจเป็นงานที่ง่าย เพราะเพียงแค่เรามองดูก็จะรู้ได้ว่ารูปไหนคือรูปที่เราต้องการ แต่ในกรณีที่เราต้องการค้นหารูปภาพในคลังรูปขนาดใหญ่ หรือในสมุดภาพที่มีภาพอยู่เป็นจำนวนมากนั้นงานนี้จะกลายเป็นงานที่ยากขึ้นมาทันที โดยเฉพาะกับระบบคอมพิวเตอร์ที่ไม่เข้าใจรูปภาพในแบบที่มนุษย์เห็นและเข้าใจ หากไม่มี Metadata หรือการจัดหมวดหมู่ให้กับรูปภาพเอาไว้ก่อนการที่จะหารูปภาพที่ต้องการจากรูปจำนวนหลายหมื่นรูปนั้นก็แทบจะเป็นไปไม่ได้เลย

เช่นเดียวกันกับการค้นหาฉากที่ต้องการในคลิปวิดีโอ การที่จะเลื่อนหาฉากที่ต้องการดูนั้นเป็นเรื่องยากและยิ่งถ้าคลิปมีความยาวหลายสิบนาทีหรือเป็นชั่วโมงนั้นการเลื่อนหาอาจใช้เวลาเยอะมากกว่าจะเจอหรืออาจจะไม่เจอเลยด้วยซ้ำ ทว่าปัญหานี้สามารถแก้ได้โดยการนำ AI ที่ชื่อว่า CLIP (Contrastive Language–Image Pre-training) เข้ามาช่วย ซึ่งมีวิธีการติดตั้งและใช้งานดังนี้

Installation

# Intall a newer version of plotly
!pip install plotly==4.14.3

# Install CLIP from the GitHub repo
!pip install git+https://github.com/openai/CLIP.git

# Install torch 1.7.1 with GPU support
!pip install torch==1.7.1+cu101 torchvision==0.8.2+cu101 -f https://download.pytorch.org/whl/torch_stable.html

ติดตั้งโมเดล CLIP จาก GitHub ของ OpenAI และลง Pytorch เวอร์ชั่น 1.7.1 พร้อม torchvision แบบที่รองรับ GPU และติดตั้ง Plotly สำหรับพล็อต Heatmap

Download CLIP Model

import clip
import torch

# Load the open CLIP model
device = “cuda” if torch.cuda.is_available() else “cpu”
model, preprocess = clip.load(“ViT-B/32”, device=device)

โหลด Weights ของ CLIP และตัว Preprocess สำหรับเตรียมข้อมูลก่อนนำเข้าสู่โมเดล และส่ง Model กับ Preprocess ไปไว้บน GPU

เตรียมข้อมูลสำหรับ Input ให้กับ CLIP

import cv2
from PIL import Image
# The frame images will be stored in video_frames
N = 5 # This is frame to skip
video_frames = []
# Open the video file
capture = cv2.VideoCapture(‘YOUR_VIDEO_FILE.mp4’)
fps = capture.get(cv2.CAP_PROP_FPS)
current_frame = 0
while capture.isOpened():
  # Read the current frame
  ret, frame = capture.read()
  # Convert it to a PIL image (required for CLIP) and store it
  if ret == True: 
    video_frames.append(Image.fromarray(frame[:, :, ::-1]).resize((224,224)))
  else:
    break
  # Skip N frames
  current_frame += N
  capture.set(cv2.CAP_PROP_POS_FRAMES, current_frame)
# Print some statistics
print(f“Frames extracted: {len(video_frames)})

ขั้นตอนนี้จะเป็นการบันทึกแต่ละเฟรมในวิดีโอไว้เป็นรูปภาพ (แปลงจากวิดีโอเป็นชุดรูปภาพจำนวนหลาย ๆ รูปเรียงต่อกัน) เพื่อให้สามารถประมวลผลในลักษณะรูปภาพได้ จากในตัวอย่างจะเป็นคลิปการเล่นบาสของ Professor Live ที่แต่งตัวเป็นซานต้าคลอส ความยาว 3 นาทีกว่า ๆ โดยมีจำนวน Frames (รูป) จำนวน 1346 ภาพที่เราสกัดออกมา

import math
import numpy as np
import torch


# You can try tuning the batch size for very large videos, but it should usually be OK
batch_size = 64
batches = math.ceil(len(video_frames) / batch_size)

# The encoded features will bs stored in video_features
video_features = torch.empty([0, 512], dtype=torch.float16).to(device)

# Process each batch
for i in range(batches):
  print(f“Processing batch {i+1}/{batches})

  # Get the relevant frames
  batch_frames = video_frames[i*batch_size : (i+1)*batch_size]
  
  # Preprocess the images for the batch
  batch_preprocessed = torch.stack([preprocess(frame) for frame in batch_frames]).to(device)
  
  # Encode with CLIP and normalize
  with torch.no_grad():
    batch_features = model.encode_image(batch_preprocessed)
    batch_features /= batch_features.norm(dim=-1, keepdim=True)

  # Append the batch to the list containing all features
  video_features = torch.cat((video_features, batch_features))

# Print some stats
print(f“Features: {video_features.shape})

นำรูปภาพทั้งหมดที่มีมาผ่านตัว Preprocess และนำเข้าสู่ส่วน Encoder ของ CLIP เพื่อแปลงเป็นฟีเจอร์ที่โมเดลสามารถรับและนำไปประมวลผลได้ (ในขั้นตอนนี้จะใช้เวลาค่อนข้างนานยิ่งมีจำนวนรูปมากก็ยิ่งนานมากขึ้น)

สร้างฟังก์ชันสำหรับค้นหารูปภาพ

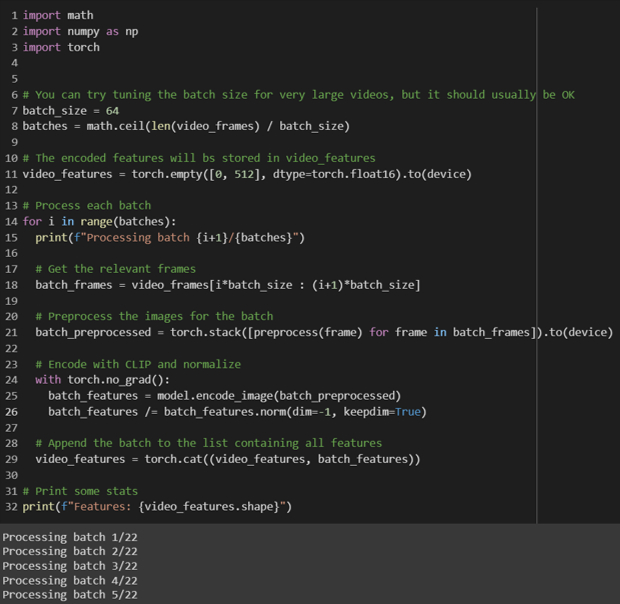
import plotly.express as px
import datetime
from IPython.core.display import HTML
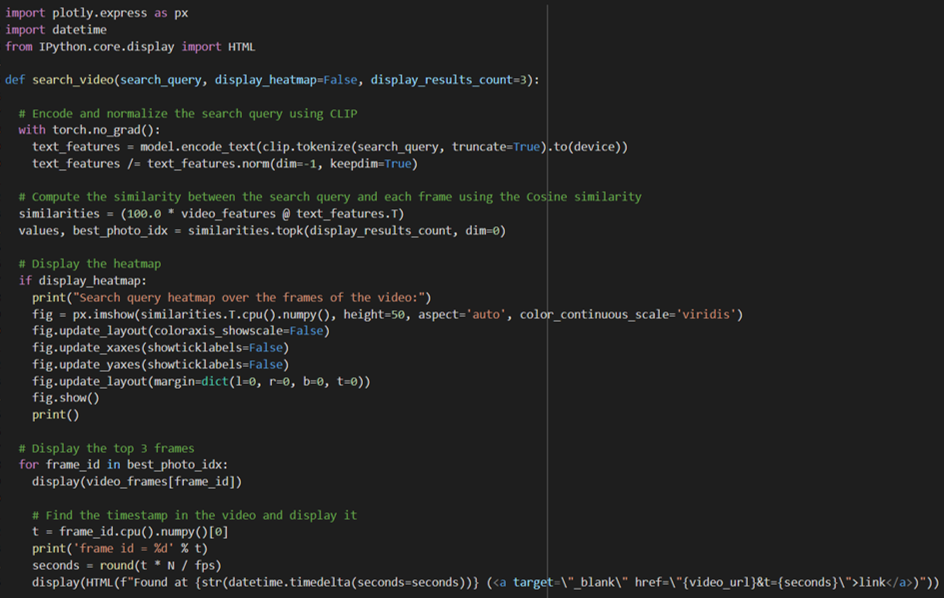
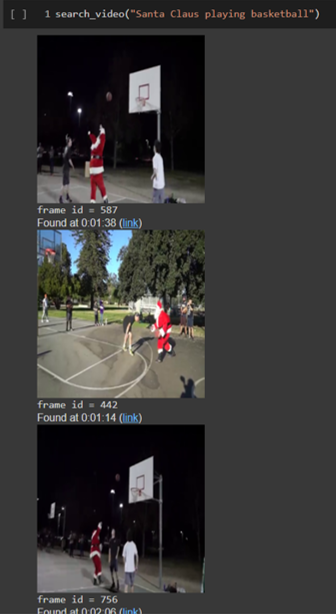
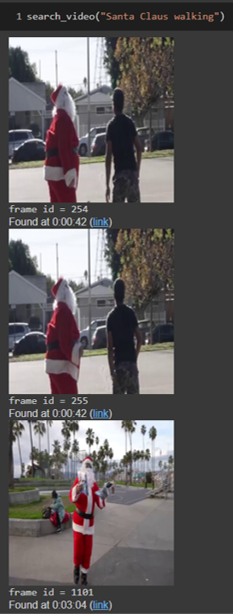
def search_video(search_querydisplay_heatmap=Falsedisplay_results_count=3):

  # Encode and normalize the search query using CLIP
  with torch.no_grad():
    text_features = model.encode_text(clip.tokenize(search_query, truncate=True).to(device))
    text_features /= text_features.norm(dim=-1, keepdim=True)

  # Compute the similarity between the search query and each frame using the Cosine similarity
  similarities = (100.0 * video_features @ text_features.T)
  values, best_photo_idx = similarities.topk(display_results_count, dim=0)

  # Display the heatmap
  if display_heatmap:
    print(“Search query heatmap over the frames of the video:”)
    fig = px.imshow(similarities.T.cpu().numpy(), height=50, aspect=‘auto’, color_continuous_scale=‘viridis’)
    fig.update_layout(coloraxis_showscale=False)
    fig.update_xaxes(showticklabels=False)
    fig.update_yaxes(showticklabels=False)
    fig.update_layout(margin=dict(l=0, r=0, b=0, t=0))
    fig.show()
    print()

  # Display the top 3 frames
  for frame_id in best_photo_idx:
    display(video_frames[frame_id])

    # Find the timestamp in the video and display it
    t = frame_id.cpu().numpy()[0]
    print(‘frame id = %d’ % t)
    seconds = round(t * N / fps)
    display(HTML(fFound at {str(datetime.timedelta(seconds=seconds))} (<a target=\_blank\ href=\{video_url}&t={seconds}\>link</a>)))

หน้าที่หลักของฟังก์ชันนี้คือรับค่าคำค้นหาที่เป็นข้อความเข้ามาและแปลงเป็นฟีเจอร์จากนั้นจึงส่งเข้า CLIP โมเดล และคำนวณหา Similarity และแสดงผลเป็นฉากที่ตรงกับคำค้นหา พร้อมกราฟ Heatmap (แต่ถ้าไม่ใช่ก็เซต display_heatmap=False ไว้ได้)

ทดลองค้นหาฉากในวิดีโอจากข้อความ

จากรูปแรก (ซ้ายมือ) ค้นหาว่า Santa Claus playing basketball ผลลัพธ์ของ CLIP จะค้นหาให้เป็นรูปซานต้ากำลังเล่นบาสพร้อมบอกว่าอยู่ที่นาทีที่เท่าไหร่ในวิดีโอ โดยสามารถเลือกได้ว่าจะให้โมเดลแสดงผลลัพธ์กี่อันดับแรกออกมา (ในที่นี้เลือกมาแค่ 3 อันดับแรก)

รูปที่สอง (กลาง) ลองระบุว่า Santa Claus walking ก็จะพบรูปซานต้าคลอสกำลังเดินเฉย ๆ แต่ไม่ได้เล่นบาส

รูปที่สาม (ขวามือ) ระบุคำค้นหาที่มีเงื่อนไขมากขึ้นเป็น A man dribble a ball ก็จะค้นเจอรูปภาพเด็กชายกำลังเลี้ยงลูกบาสเกตบอล

ทดสอบค้นหากับวิดีโอที่เป็นเชิง Conceptual เฉพาะอย่าง Dragonball ก็จะเห็นว่า CLIP AI เองก็ยังรู้จักซูเปอร์ไซย่า, โกคูไซย่าบลู, หรือแม้กระทั่งโบรลี่ แสดงให้เห็นว่าโมเดลมีประสิทธิภาพเพียงพอที่จะค้นหาชื่อเฉพาะบางอย่างได้เช่นกัน

ติดตามบทความอื่น ๆ เพิ่มเติมได้ที่ SBC Blog

LINE OA: SUBBRAIN

Facebook: SUBBRAIN

Categories: Data&IT